"All for one and one for all!" makes a great family motto when it comes to an emergency evacuation. When everyone has designated jobs and knows exactly what to do, your family can be packed and out of town before most other families grab their toothbrushes. To make this happen and avoid panic, chaos, and needless tears, your family needs an evacuation plan.
When I first started thinking about the possibility of evacuating from our home, I visualized sheer panic. Immediately, I realized the need for a written list of procedures posted in two or three locations and a family meeting or two to insure that everyone was informed and on board. As I put our evacuation plan together, five basic steps became apparent.
Digital Heat Gun
1. Make provisions for animals.
2. Pack personal necessities, food, and water.
3. Prepare the house.
4. Pack important documents and a computer.
5. Insure the vehicle is ready to go.
Follow these five simple steps to create your own evacuation plan, and then delegate and rehearse.
1. Make provisions for animals
I put this at the top of my plan because of the words in Proverbs 12:10a, "The godly care for their animals," and because I'm crazy about our four dogs and our lone cat, Daisy. There were so many unnecessary tragedies that involved beloved pets in the aftermath of Hurricane Katrina, and after watching that unfold, I determined that I would never leave ours behind.
Once you've made the decision to evacuate , one of the first steps should be to contain them. You don't need them underfoot as you rush around, and your kids will be reassured that their beloved pets are being cared for. Delegate this task to one or two family members.
Depending on the size of your dogs and cats, you may want to first load their crate in your vehicle and then the animal(s). So, first on my list is to load the dog crate in the Tahoe, and put each dog inside. We have four small dogs so they all fit, in a cozy sort of way!
Pre-position collars, leashes, and a water and food bowls in the crate, along with some dog food, double-bagged in two large Zip-Locs. (Ants love dog food!) Add the dog, and you're good to go!
Our next step is to put the cat in her crate, and keep her away from the dogs!! If your cat isn't used to being in a carrier, now is the time for Crate-the-Cat practice! Along with her crate, pack a small package of kitty litter and her food.
If you're the proud owner of fish, reptiles, rodents and/or farm animals, consider whether or not you'll take them along, leave them on their own with a plentiful supply of food and water, or transport them to another location. Have a Plan B for their care in case circumstances suddenly change.
2. Personal necessities, food and water
While the designated family member is rounding up the animals, delegate who will be responsible for the following.
o Loading 72 Hour Kits, if you have them. Take some time now to put these kits together while you have time and are not under any duress. I carry a Vehicle 72 Hour Kit in my Tahoe at all times in case of emergencies while we're on the road. If we only had time to grab our Kits, at least we'd have the most necessary items for survival to get us through the first three or four days.
o Load firearms and ammunition. Guns are one of the first things vandals look for, and I don't want them getting into the wrong hands. In a worst case scenario, we may need them for defense.
o Cash. I usually keep this in twenty dollar bills or smaller. In case of a widespread electrical outage, ATMs and credit/debit card machines may not be working. I want to be sure we can pay for hotels, gas and food.
o An emergency toilet: a five-gallon bucket with plastic liners. This bucket also holds a couple of small blankets, toilet paper and a bottle of bleach/water mixture. You can even buy a toilet seat designed to fit one of these buckets. I've read accounts of the Hurricane Ike evacuation in 2008, and I don't want my family using the side of the road as a toilet. Enough said.
o Load additional food and water, as much as there is room for. Your 72 Hour Kits will contain emergency provisions, but extra food will always come in handy. Collapsible water containers are a good option since they gradually take up less space as they're emptied. Water weighs
o Bedding items, such as sleeping bags, blankets, and pillows. How much you can take with you will depend on how much room you have left in your vehicle. I always keep a couple of lightweight blankets rolled up under the back seat, just in case.
3. Prepare the House
As you drive away from your home, no doubt you'll have feelings of sadness and, perhaps, loss. Write out a plan to protect your home if you must evacuate, and you'll increase the chances of having a home to come home to. Here is a checklist I've used.
o Turn off gas and water.
o Go out to electrical panel and switch off everything except for the breakers marked for the kitchen.
o Unplug everything in the house except refrigerator, freezer and a kitchen lamp. Even if our entire neighborhood is evacuated, I would just rather my home look occupied.
o Shut down and unplug the computers.
o Close and lock all windows. Close blinds and curtains.
o Depending on the current weather, turn off air conditioner and/or heat or set them at minimal levels.
4. Pack important documents and a computer
o Load our strong box. (This contains originals of things like Social Security cards and birth certificates.)
o Pack my Grab-and-Go Binder containing copies of vital financial and family documents and my Survival Mom Binder with printed information helpful in emergencies, such as maps and water purification instructions.
o Use a flash drive to save important business and financial information from our desktop computer. Pack flash drive with laptop.
o Pack our laptop computer. Make sure to include the charger!
5. Insure the vehicle is ready to go
Hopefully, you've been keeping an eye on weather and news reports and have made sure your vehicle's gas tank is full. In addition to that simple, obvious step, here are a few more.
o Load extra gas cans, if you have them.
o Pack tools we might need. A claw hammer or a Phillips screw driver might make all the difference in the world in a survival scenario.
o Be sure you have everything necessary for dealing with a flat tire, including a spare.
Depending on how much time we have and how much room is left in the Tahoe, we'll also pack extra clothing. There's a change of clothes or two in our 72 Hour Kits, but if we are gone for days or weeks, we'll need more. We can pack these in large plastic trash bags. Ugly, but they're not as bulky as suitcases. Hey, they could double as raincoats in an emergency!
When our plan was finished, I discussed each step with my husband, and we delegated each task to a different family member. In a crisis situation, assigned tasks will help defuse feelings of panic and confusion. It's more difficult to become hysterical when you have something to focus on. Not impossible! Just more difficult!
I'm very aware that an emergency evacuation may happen while my husband is not at home, so I've made sure that I know how to turn off the gas, water and electricity in case it's just the kids and me.
There's one step missing. Will this really work? How much time will it take, and will there be any room for passengers in the Tahoe once it's loaded?? Obviously, we need an evacuation drill. Sounds like a great summertime family activity to me!
"Hey kids! Let's pretend there's a mountain of red hot lava rushing toward us, and we have to be out of the house in thirty minutes. Everybody know their jobs? Okay! Ready.....GO!!!"
If you live in an area prone to hurricanes, wildfires, and the like, you already know a thing or two about bugging out in a hurry. Share your experiences and tips on this blog.
Cyber Monday Milwaukee 8988-20 Variable Temperature Heat Gun 2011 Deals
Dec 02, 2011 11:16:02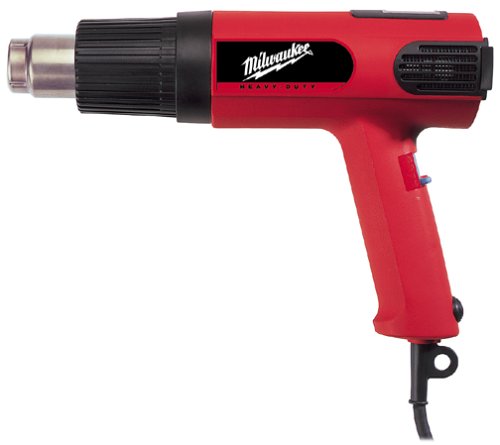
Click for larger image and other views

Cyber Monday Milwaukee 8988-20 Variable Temperature Heat Gun Feature
- Ceramic encapsulated heating element for maximum tool life
- LED Digital Readout Display shows present temperature in increments of 10º F
- One hand operation with lightweight and easy grip handle
- Upright stationary use with pads on back cap and lower handle
- Limited warranty
Cyber Monday Milwaukee 8988-20 Variable Temperature Heat Gun Overview
This variable temperature heat gun offers a range from 90 to 1050deg Fahrenheit. The LED digital readout display allows you to monitor the temperature via a digital display when precision control is needed. Three controlled air volumes, 7.06/8.83/15.89 cu.ft.min., allow you to match the air speed to your application. The first stage air volume does not include heat for cooling applications. Volts: 120 AC, Amps: 12.5, Required CFM: 7.06, 8.83, 15.89, Heat Settings: Variable, Temperature Capacity (deg F): 90 - 1,050, Case Included: NoSAVE NOW on Cyber Monday offers below!
Available In Stock. |
| This Cyber Monday Milwaukee 8988-20 Variable Temperature Heat Gun ships for FREE with Super Saver Shipping. |
Price : Click to Check Update Prices Please. |

Limited Offer Today!! Milwaukee 8988-20 Variable Temperature Heat Gun Cyber Monday and Black Friday 2011 Deals
Digital Media Recorder Industrial Power Tools Ipod Sounddock
